One of my passions is baking. No, not pastries and cakes and crap like that - I'm talking about bread. European breads - ciabattas, sour doughs, and bagels. In general, I prefer naturally leavened breads over those leavened with yeast.
Following are a few tips I've picked up along the way
- If you're using yeast, go with the instant yeast. You don't have to mess with the hot water, which if you screw up can kill the yeast. Instant is reliable, until it gets too old (six to nine months if not refrigerated)
- Use a scale. I love knowing that 2 cups of flour is 9 ounces, and pouring it directly from the bag. Plus it's nice to get your bagels all
 between 3 5/8 oz and 3 7/8 oz. OK, call me anal.
- Use a pre-ferment. A good bread takes two or three days to build. Don't even think about coming home from work and whipping up a loaf of bread that night. It's possible, but it will taste yeasty and won't have nearly the character it should.
- Naturally leavened bread is the best. I've got a sourdough starter in my fridge that I made three years ago, and it's still going strong.
I won't be posting any bread-baking recipes on this blog, as I've not invented any of my own. All of my breads (well, I add a little variety) come from this cookbook: Crust and Crumb
Let me talk a little bit about the bread making process.
The Sourdough Starter
Once you make a sourdough starter, it will give you companionship for years. It's lower maintenance than other pets, gives you attention only when you want it, and doesn't cost too much to feed. As long as you bake every one or two months, you can ignore the starter until it's time to bake. If it has been as long as two months, I will spend three or four days getting it good to go for another recipe. It will be completely inert and have a pool of grey liquid on top. I stir it up, toss a couple of cups down the drain, then prime it with two cups of flour and 1.5 cups water. Stir it all up, let it sit out for a few hours, then refrigerate. Repeat the process on days two and three. You'll know it's good to go when it's frothy on top (pictured - at the end of the proofing stage) and when you pull it out of the refrigerator the next day, there's not much l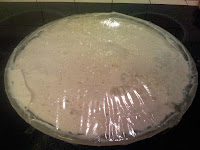 iquid that's separated from the sponge. Now you're ready to start baking.
The Pre-ferment
Most of my recipes use a firm pre-ferment, called a biga. To make this, I take two cups of starter and two cups of flour, mix it up, knead it, and let it rise for two to six hours (depending on your climate). I live in Houston, where my house stays a comfy 80 degrees, so in general, I proof my doughs for about half the time recommended in the book. You refrigerate this overnight, then use it in your bread recipe the next day.
The Second Day
Here's where you take your pre-ferment, let it warm to room temp (1 hour) and mix your bread recipe. You'll let the dough rise for a couple of hours, then shape loaves or bagels and let them rise an hour or two, then refrigerate. You can bake the next morning.
The Process
So the way I do it is I decide I'm going to make bagels on Wednesday. I have Saturday and Sunday to get my sourdough starter going, Monday night, I do the pre-ferment, and Tuesday night I make the bagels. Wednesday morning, I get up a little early, bake the bagels and take them into work. This makes me very popular at work.
The other thing I do is do two or three batches of bread two or three days in a row. So on Tuesday night, while I'm making my bagels, I'll make another pre-ferment for something to bake on Thursday. I make a great multi-grain sandwich bread which is about the best sandwich bread I've ever tasted in my life. I'm not bragging - it's all in the cookbook.
Overproofing
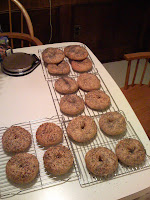
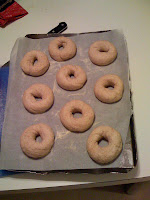
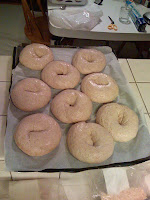
Yes, this can happen to the best of us. I've done it a number of times with my bagels - nowadays I hardly let them proof at all, or they get overexuberant, blow their wad, and when I get up to bake them they're all puffy-eyed and unmotivated. If you look at the bagels in the picture, you'll notice these are a tad on the flat side. I let time get by me and let them proof for 1.5 hours instead of one hour, and they got a little carried away (see before and after pictures above). I let this happen to my last sandwich bread recipe when I fell asleep watching TV and instead of refrigerating the loaves at midnight, they were up partying until 3AM. Instead of a beautiful cresting loaf, I had kind of a square brick with a flat top. It still tasted good, though!
Get the book and enjoy.
Cheers,
dave


