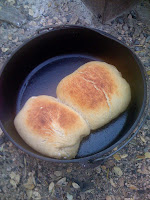
After a few fits and starts, I've finally got the Dutch Oven thing down. I've moved from burnt-bottomed biscuits to ciabatta. Hell, I even did a batch of brownies on my last camping trip and they turned out perfectly. It's kinda cool to be at that level of maturity in my dutch oven baking. I'm wondering if there's a certifying body or something. I'd love to put "Dutch Oven Certified" on my business card.
So, what I did was make the ciabatta dough prior to departing on my camping trip. I used:
1 cup sourdough sponge (or poolish sponge)
5 cups unbleached bread flour
1 cup whole wheat flour
1/4 tsp instant yeast
1 cup water
1 tsp brown sugar
1 tsp salt
Mix this stuff up, beat it and all that. Knead it, too! The consistency of this should be much moister than what you would expect in a bread dough - really too moist to knead by hand. Use a wooden spoon or a mixer. Cover tightly, let it rise a bit for about 3 hours, then refrigerate overnight.
When you're ready to make some bread, dump the dough out onto a heavily floured work surface, and cut it into three equally sized pieces. Stretch each piece about 12 to 18 inches like it's a piece of toffee or something. I like to then fold the piece into thirds. Put the pieces on some floured cookie sheets or parchment paper, mist with cooking spray, cover, and let rise for about three hours. Two hours if it's really warm, or four if it's a mite chilly. The loaves should rise to where they're sticking up against that plastic bag like the belly of a pregnant woman in a tight shirt.
For those of you unaccustomed to dutch oven baking, I'm about to accustom you.
By now, you should have a nice hot fire - regular ol' charcoal is easier to manage for this purpose. Spread out a nice bed of coals and preheat the oven with the lid on by setting on top of said bed. When you're ready to bake, spray the interior of the oven with some cooking spray (or if you don't have that, lube it up with some olive oil prior to preheating). You need to have some coals to the side ready to put on the lid - preferably using a camp shovel.
This is the tricky part - pick up the loaves by hand and position in the dutch oven. Three will fit in a larger one (I think mine is like 16 inches). Otherwise, you can only do two. I hate picking up the loaves by hand, because they deflate a bit. It's not like using a peel and just sliding them into the oven.
Get over it, then mist the loaves with water and cover. Shovel a bunch of hot coals on the lid of the oven and set your mental timer for 5 minutes.
Ding! Remove the dutch oven from its position on the bed of coals. Five minutes is about all you can do on the bottom.
After another 10 minutes, pare down your supply of coals on the top of the oven until it's about 75% covered. Basically, you're trying to go from around 450 degrees to 350. Bake for another 20 minutes, checking periodically. If you see too much browning on the top while the sides are quite white, take a few more coals off. You want to get these loaves fairly browned as evenly as possible. What's pictured is the loaves about 10 minutes before they were finished.
It smells pretty damn good to have some bread baking around a campground.
Pull it out and eat it when it's done.
dave

No comments:
Post a Comment