Wednesday, December 19, 2007

Chili Smoked Catfish


This is a recipe I've borrowed from the Sublime Smoke cookbook. That book is, ahem, sublime. I haven't smoked in awhile, and I got the hankering for some fish the other day. I needed to feed a large group, so I made it catfish. OK, so call me cheap.

I took 7 catfish filets and marinaded them in
  • 1.5 cups white vinegar
  • 1 cup dry white wine
  • 6 tblsp roasted chili powder
  • 4 tblsp brown sugar
  • 2 tblsp coarse sea salt
  • 2 tblsp coriander
  • 1 tblsp dill seed
for about three hours. The recipe says you can even do this the night before, which is a must if you're intending to prepare this dish after work on a weeknight. (it calls for monkfish, too, but my local grocer only has that stuff once in a blue moon)

Smoke said catfish for about 35 minutes. I let it get nice and flaky (almost a bit too flaky, as you can tell by the picture - one guy didn't survive extraction in one piece).

I served this with some sauteed mushrooms, brown rice, and asparagus. After sauteeing the mushrooms in olive oil, I added about half a cup of the same wine I used on the fish, and a tablespoon of chili powder to ensure its compatability as a topping. I was thinking of doing a lemon butter sauce, but opted out on the account of trying to make the meal heart-healthy. I also squeezed fresh lemon on fish, mushrooms, and asparagus immediately before serving.

This served 6 adults and a couple of little kids.

Tuesday, November 20, 2007

Campground Cooking


You know, I don't eat a lot of eggs at home, but it seems that when you're camping, some good breakfast tacos are de rigeur.

I think everybody knows how to do this - start with a little chorizo, add some onions and peppers, eggs, and at the last minute, shredded cheese.

What's optional is the Bloody Mary accompanyment.

There's just something about campground cooking that makes everything taste better.

dave

Dutch Oven Ciabatta


After a few fits and starts, I've finally got the Dutch Oven thing down. I've moved from burnt-bottomed biscuits to ciabatta. Hell, I even did a batch of brownies on my last camping trip and they turned out perfectly. It's kinda cool to be at that level of maturity in my dutch oven baking. I'm wondering if there's a certifying body or something. I'd love to put "Dutch Oven Certified" on my business card.

So, what I did was make the ciabatta dough prior to departing on my camping trip. I used:

1 cup sourdough sponge (or poolish sponge)
5 cups unbleached bread flour
1 cup whole wheat flour
1/4 tsp instant yeast
1 cup water
1 tsp brown sugar
1 tsp salt

Mix this stuff up, beat it and all that. Knead it, too! The consistency of this should be much moister than what you would expect in a bread dough - really too moist to knead by hand. Use a wooden spoon or a mixer. Cover tightly, let it rise a bit for about 3 hours, then refrigerate overnight.

When you're ready to make some bread, dump the dough out onto a heavily floured work surface, and cut it into three equally sized pieces. Stretch each piece about 12 to 18 inches like it's a piece of toffee or something. I like to then fold the piece into thirds. Put the pieces on some floured cookie sheets or parchment paper, mist with cooking spray, cover, and let rise for about three hours. Two hours if it's really warm, or four if it's a mite chilly. The loaves should rise to where they're sticking up against that plastic bag like the belly of a pregnant woman in a tight shirt.

For those of you unaccustomed to dutch oven baking, I'm about to accustom you.

By now, you should have a nice hot fire - regular ol' charcoal is easier to manage for this purpose. Spread out a nice bed of coals and preheat the oven with the lid on by setting on top of said bed. When you're ready to bake, spray the interior of the oven with some cooking spray (or if you don't have that, lube it up with some olive oil prior to preheating). You need to have some coals to the side ready to put on the lid - preferably using a camp shovel.

This is the tricky part - pick up the loaves by hand and position in the dutch oven. Three will fit in a larger one (I think mine is like 16 inches). Otherwise, you can only do two. I hate picking up the loaves by hand, because they deflate a bit. It's not like using a peel and just sliding them into the oven.

Get over it, then mist the loaves with water and cover. Shovel a bunch of hot coals on the lid of the oven and set your mental timer for 5 minutes.

Ding! Remove the dutch oven from its position on the bed of coals. Five minutes is about all you can do on the bottom.

After another 10 minutes, pare down your supply of coals on the top of the oven until it's about 75% covered. Basically, you're trying to go from around 450 degrees to 350. Bake for another 20 minutes, checking periodically. If you see too much browning on the top while the sides are quite white, take a few more coals off. You want to get these loaves fairly browned as evenly as possible. What's pictured is the loaves about 10 minutes before they were finished.

It smells pretty damn good to have some bread baking around a campground.

Pull it out and eat it when it's done.

dave

Tuesday, November 6, 2007

Pinot Noir

You know, I like Pinot Noir. I liked it before I saw Sideways, too. OK so I buy it a bit more often after I heard the poignant description about the grape's temperment and potential for excellence from Paul Giamatti's character. You gotta respect the opinion of any wine connoisseur who loves the sauce so much, he'll confuse the spittin' trough for a beer bong.

I went to a wine tasting a number of years ago, where I learned that Pinot was a nice accompaniment for pork (among other things). I did find the Pinot is definitely not a cocktail wine - merlot seems the best to suit that purpose among the reds - but once the saliva and acids get going in the mouth, Pinot is tremendous with a nice pork roast, a spicy chicken dish, or even the occasional beef dish. It has a light body but enough acidity to match up to full flavored fare. I'm loving it these days.

My most recent find was an inexpensive 2006 Oregon Pinot called Kings Ridge. Oregon, you say? I've always wondered about those Oregon and Washington wines, but then I realized that, hey, they're right there jostling with northern California, and they're just as liberal. There must be some good wines coming out of there, too.

So my point today is, if you've got a pork tendrloin roast, crack open a bottle of Pinot. You won't regret it. That's what I did last night. Sure, I took it easy by buying a peppered pork tenderloin and baking it with onions, apples, and rosemary. I made a gravy out of the drippings to pour across the basmati rice on the side, and served it with asparagus. It was a pretty simple meal, but the Pinot made it a bit more special.

I even had enough of the bottle left over to use in the marinera sauce tonight. But that's a different story. My ziti awaits!

ciao,
dave

Friday, October 19, 2007

Smoked Salmon - Sugar and Spice


I gotta tell you, I love smoking. Partly because it sets cooking into slow motion, so you can enjoy the experience for a longer period of time. Kind of like going into a black hole, but without the relativity thing. Another reason is you can more easily avoid screwing up what you're doing.

Think about fish. If you're going to sautee or broil a nice filet, you may only be talking about four or five minutes of cooking time. A one or two minute error in cooking time can mean the difference between a moist succulent meal and getting the ol' "Dave, you overcooked the fish again." On the smoker, one or two minutes is nothing. Do I cook the fish 40 minutes? 50 minutes? Who cares? As long as I take a peek at it somewhere within the right five minute inverval, I can pull it out and it will always be done to perfection.

This recipe comes courtesy of a great smoking cookbook called Sublime Smoke. Well, I don't know how courteous those folks were - I didn't ask. So I won't divulge too much here - for quantities, go buy the book.

gin
brown sugar
coarse sea salt
anise
dill seed
whole coriander, bruised

Mix up all of these ingredients in a bowl, add the salmon, cover, and marinade in the refrigerator for at least two or three hours. Smoke it for 45 minutes to an hour. Smoking times will vary depending on your heat. My smoker is a vertical model that runs about 250 degrees or more, so it may be faster than some of the nice indirect heat models with the firebox on the side.

For flavor, I use hickory or pecan. Mesquite will give this too bitter a taste.

The picture depicts two small filets - I had a remnant of wild salmon (the dark red) in the freezer, and I went out and bought a little Scotland farm-raised for about half the price of the wild. The fresh farm-raised was much better than the frozen wild stuff (duh).

Another note about Sublime Smoke: I've done a number of recipes from this book, including chili-smoked monkfish (yowza!) and tandoori chicken. It has inspired me to smoke rather than grill just about all of my meats - including hamburgers, steaks, and fajitas.

That's about it, compadre. Enjoy!

Friday, October 12, 2007

Some Thoughts on Baking Bread

One of my passions is baking. No, not pastries and cakes and crap like that - I'm talking about bread. European breads - ciabattas, sour doughs, and bagels. In general, I prefer naturally leavened breads over those leavened with yeast.

Following are a few tips I've picked up along the way


  • If you're using yeast, go with the instant yeast. You don't have to mess with the hot water, which if you screw up can kill the yeast. Instant is reliable, until it gets too old (six to nine months if not refrigerated)

  • Use a scale. I love knowing that 2 cups of flour is 9 ounces, and pouring it directly from the bag. Plus it's nice to get your bagels all between 3 5/8 oz and 3 7/8 oz. OK, call me anal.

  • Use a pre-ferment. A good bread takes two or three days to build. Don't even think about coming home from work and whipping up a loaf of bread that night. It's possible, but it will taste yeasty and won't have nearly the character it should.

  • Naturally leavened bread is the best. I've got a sourdough starter in my fridge that I made three years ago, and it's still going strong.

I won't be posting any bread-baking recipes on this blog, as I've not invented any of my own. All of my breads (well, I add a little variety) come from this cookbook: Crust and Crumb


Let me talk a little bit about the bread making process.


The Sourdough Starter


Once you make a sourdough starter, it will give you companionship for years. It's lower maintenance than other pets, gives you attention only when you want it, and doesn't cost too much to feed. As long as you bake every one or two months, you can ignore the starter until it's time to bake. If it has been as long as two months, I will spend three or four days getting it good to go for another recipe. It will be completely inert and have a pool of grey liquid on top. I stir it up, toss a couple of cups down the drain, then prime it with two cups of flour and 1.5 cups water. Stir it all up, let it sit out for a few hours, then refrigerate. Repeat the process on days two and three. You'll know it's good to go when it's frothy on top (pictured - at the end of the proofing stage) and when you pull it out of the refrigerator the next day, there's not much liquid that's separated from the sponge. Now you're ready to start baking.


The Pre-ferment


Most of my recipes use a firm pre-ferment, called a biga. To make this, I take two cups of starter and two cups of flour, mix it up, knead it, and let it rise for two to six hours (depending on your climate). I live in Houston, where my house stays a comfy 80 degrees, so in general, I proof my doughs for about half the time recommended in the book. You refrigerate this overnight, then use it in your bread recipe the next day.


The Second Day


Here's where you take your pre-ferment, let it warm to room temp (1 hour) and mix your bread recipe. You'll let the dough rise for a couple of hours, then shape loaves or bagels and let them rise an hour or two, then refrigerate. You can bake the next morning.


The Process


So the way I do it is I decide I'm going to make bagels on Wednesday. I have Saturday and Sunday to get my sourdough starter going, Monday night, I do the pre-ferment, and Tuesday night I make the bagels. Wednesday morning, I get up a little early, bake the bagels and take them into work. This makes me very popular at work.


The other thing I do is do two or three batches of bread two or three days in a row. So on Tuesday night, while I'm making my bagels, I'll make another pre-ferment for something to bake on Thursday. I make a great multi-grain sandwich bread which is about the best sandwich bread I've ever tasted in my life. I'm not bragging - it's all in the cookbook.


Overproofing


Yes, this can happen to the best of us. I've done it a number of times with my bagels - nowadays I hardly let them proof at all, or they get overexuberant, blow their wad, and when I get up to bake them they're all puffy-eyed and unmotivated. If you look at the bagels in the picture, you'll notice these are a tad on the flat side. I let time get by me and let them proof for 1.5 hours instead of one hour, and they got a little carried away (see before and after pictures above). I let this happen to my last sandwich bread recipe when I fell asleep watching TV and instead of refrigerating the loaves at midnight, they were up partying until 3AM. Instead of a beautiful cresting loaf, I had kind of a square brick with a flat top. It still tasted good, though!


Get the book and enjoy.


Cheers,


dave

Thursday, October 11, 2007

Beef Stroganoff


OK, OK, this is a pretty tame recipe. But I just made it tonight, so I want to capture and immortalize my experience. This recipe starts with a lame joke - "What do you call a herd of masturbating cattle?" "Beef strokin' off."

OK, I thought it was funny back when I was a teenager, but I still call the dish by this name, so I couldn't resist.

So, this is pretty simple and hard to screw up. This is a 30 minute to one hour dish, so you can get it going right when you get home from work.

1 lb. ground beef
1/2 onion
1/2 lb. fresh mushrooms
something spicy (1/2 a jalapeno, or 1/2 tsp red pepper flakes, or whatever you like)
at least 12 turns fresh ground black pepper
1/2 tsp salt
a bit o' flour
1 tbsp olive oil
1/2 to 1 cup Marsala or other cooking wine
3/4 to 1 lb. sour cream

Brown a pack of ground beef until, well, until it's brown. Set the beef aside and pour off the grease. If you're from the American South, retain the grease for the next step.

If the grease thing doesn't apply to you, heat the olive oil. Slice up mushrooms and onion, add appropriate spices, and saute until they look like they've been sauteed (you know what I mean). What I like to do here is sprinkle about a tablespoon of flour on the mushroom/onion mixture to prepare for a gravy. Pour wine into the mixture and reduce until you've got a fairly thick, but definitely a liquid mixture (that's what's pictured - you don't want it any thicker than this). Add the beef and sour cream and stir in until it looks like something you want to eat. It needs to be quite liquidy, as you're going to add a bunch of pasta in a minute, and you need to be able to soak that up.

In the meantime, I hope you've been boiling the pasta per the instructions on the package. Drain into a collander.

I like to add the pasta until it looks just about right. I've made the mistake of dumping the whole pound of pasta into the same dish as the beef sauce, and ended up with a bad ratio (generally, too much pasta). You want to stir up the pasta in the sauce while on a warm heat to give the sauce a chance to soak in. You also need to heat this long enough to make sure the whole mess gets warm.

This goes without saying, but here's where you eat it. Enjoy!

dave

Monday, September 24, 2007

Regular ol' Pinto Beans - but better


A staple of my diet for the past 15 years has been "Beans & Tortillas," ie, burritos. Up to once a week, I would heat up a couple of cans of Trappey's jalapeno pintos (or, the Ranch Style brand, or Whole Foods' 365), add a bunch of comino, some chopped onions, and fresh ground black pepper. I'd heat a couple of tortillas (or even fry up some chalupas) add grated cheddar and jack cheese, and roll it all up with a pico de gallo or fresh avocado topping. This is one of our all-time favorite meals.

Nowadays, I eschew the canned beans and roll my own, so to speak. When my stocks run low, I buy a pound of dry pintos and spend a couple of days making some damn good beans.

Ingredients
1 pound pintos (dry)
one smoked poblano pepper
2 tablespoons comino (cumin)
1 tablespoon chili powder
1 tsp olive oil (or a bit of bacon or salt pork)
several turns of fresh ground pepper
1 tsp salt
tortillas or cornbread, cheese, and toppings

Dry beans can be intimidating for the novice. This isn't something you can decide to make one night. I always buy a bag full when I know I'm running out, and just start this recipe up while Im in the middle of something else in the kitchen. I especially enjoy doing this on a Wednesday or Thursday night, giving me the opportunity to get the batch going during the day Saturday, making a nice Saturday dinner or afternoon snack.

So, I've just spilled the beans - this recipe takes a couple of days. Deal with it, hombre.

Put the beans in a bowl with at least 25% room left, and cover them with water. Over the first few hours, you'll have to monitor and add water to keep them covered. They'll suck up that water and expand pretty quickly over the first few hours. I had a few too many beans in my bowl the last time, and the guys on top were not covered with water and sprouted. That didn't save them, as I ate 'em anyway.

Up to three days later, rinse the beans and prepare for cooking. On the second day, you'll see a little fermentation going on. That's pretty cool. The third day is even cooler. All that is OK. It may look a little funky, but it's a bit less musical in the end if you get my drift.

OK, so what the hell do we do now?

First of all, I hope you didn't shy away from the smoked pepper. I like to throw a poblano in the smoker the week before I know it's bean time. Since I'm normally smoking some meat or fish about once or twice a week, I don't have to fire that bad boy up just for one chipotle pepper. I can put that in the fridge and it's good to go at any time over the next week. When I'm ready to use it, I peel off the waxy skin, stip out the seeds, and chop it up. If you don't want to mess with that, use some canned chipotle peppers or just chop up a fresh jalapeno. To me, this is the ingredient that makes these the best beans I've ever had, so try it out if you can.

OK, now you can start cookin.'

Rinse the beans, throw them in a stock pot, and add all the ingredients. I just ball-parked the comino / chili powder usage. I'm used to just shaking the crap out of that stuff until it looks right. Also, some chili powders are hotter than others, so I vary the usage of that based on taste. It's hard to use too much comino, though. That's about the best spice in the world.

Bring all this stuff to a boil and then cook it on low for at least four hours. On my electric stove top I move the temp from 2 to 1 to Warm and back up the scale. You need to go higher than W for most of the cooking, but you dont want to be burning the stuff, either.

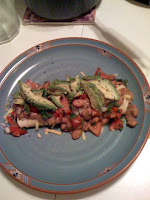
I roll this up in warmed tortillas with grated cheese, and top said tortillas with aforementioned veggies.

A full batch makes about four meals (for two). I store two or three batches in 1 qt containers in the freezer, so I can quickly deploy a fast dinner without having to break out the can opener.

enjoy!

Lamb Dumpling Pot Stickers

Ingredients
1 lb. ground lamb
4-6 cloves garlic
6 sprigs fresh rosemary
cooked rice - about 1 cup
salt to taste
up to 1 pepper (jalap, serrano, or habanero)
won ton wrappers
1 cup chicken boullion mixed with
1/4 cup rice or white vinegar

Many years ago, my favorite Chinese restaurant in Houston had the best dumplings I've ever eaten - Lamb Dumplings. A few years ago, I started making my own steamed and fried dumplings, so I started searching for a good recipe for lamb. Apparently, this isn't a Chinese recipe, because as I looked on line for a good recipe, all of them hailed from Kazakhstan. These are shaped like a little purse with a drawstring and deep fried.

So I made 'em. Since then, I've modified the recipe using just a few basic elements from the original, and switched to potsticking them rather than deep frying them.

So, I take the lamb, sautee it with garlic, a lot of fresh rosemary (I take about six good sprigs from my garden and chop it up), and as much of the pepper as you want, based on your tolerance for heat. I sautee all that stuff up, drain the grease, and mix it with about a cup of cooked rice. (I always use basmati brown rice)

I'll add a few good shakes of salt and stir it all up.

I'm not going to go into how to roll dumplings here - there are a number of videos on You Tube where you can get a real Asian person showing you this. I'm a clumsy American guy. I then cook the dumplings in a skillet, and after browning each side, pour in about a half a cup of the chicken boullion / white vinegar mix to steam up and cook the rest of the dumplings.

Serve with soy sauce.